
Building a resume-job matching service
(Part 4)
A personal project in web scraping, ML/NLP, and cloud deployment
Part 4 Summary
I describe the deployment of my web-scraping, job-matching service on Amazon Web Services (AWS) to enable scalable cloud-based pipeline execution.
Deploying to AWS
In Part 4 of this project, I'm going to discuss the process of deploying the systems I discussed in Parts 2 and 3 to the cloud. Although this is a personal project of mine, there are three big reasons to deploy my project to AWS:
- 1. Scalability. On the local machine, my pipeline execution is limited by the number of CPU threads, which limits the web-scraping speed and prevents multiple pipelines from executing simultaneously. On AWS, my pipeline can run as many concurrent executions as I'm willing to pay for.
- 2. Ease of use. Instead of starting up a new local environment and running through the scripts, the static, Dockerized containers accessable from an API make it very easy to initiate new job search queries. Since computation is in the cloud, my own machine is free to perform other tasks while I wait without a loss of performance.
- 3. Future user deployment. While for now I only intend to use this system myself, deploying the pipeline to AWS makes it easy to transition this into a viable service which other people can use in the future.
With this in mind, let's dive in to my deployment architecture.
AWS system architecture
Here's my deployment architecture:

Let's break down each block: first, I am using Amazon Elastic Container Registry (ECR) to store my Docker containers for the Lambda functions which are used to initialize the step function and within the step function itself. I created an API Gateway which acts as the interface between the user (via requests or Postman Agent) and the pipeline. When a query is POST'ed to the API, it runs the Initializer function, which initializes the step function and returns the step function's "executionArn" to the API (the Amazon Resource Name, or ARN, is the unique id of the resource object). This allows the user to later poll the API on the status of the execution and retrieve results with a GET request to the Poll Lambda function. The step function pipeline runs (more below about the step function architecture) and stores the scraped job data into a DynamoDB database. After scraping, the step function performs the similarity search described in Part 3 and finally returns the top ranked jobs to the user via the same API Gateway.
Not too complicated, right? It's a simple loop, with the API allowing query submission and result polling, while everything on the AWS side executes in a more-or-less linear fashion. Let's take a deeper look at the step function itself:
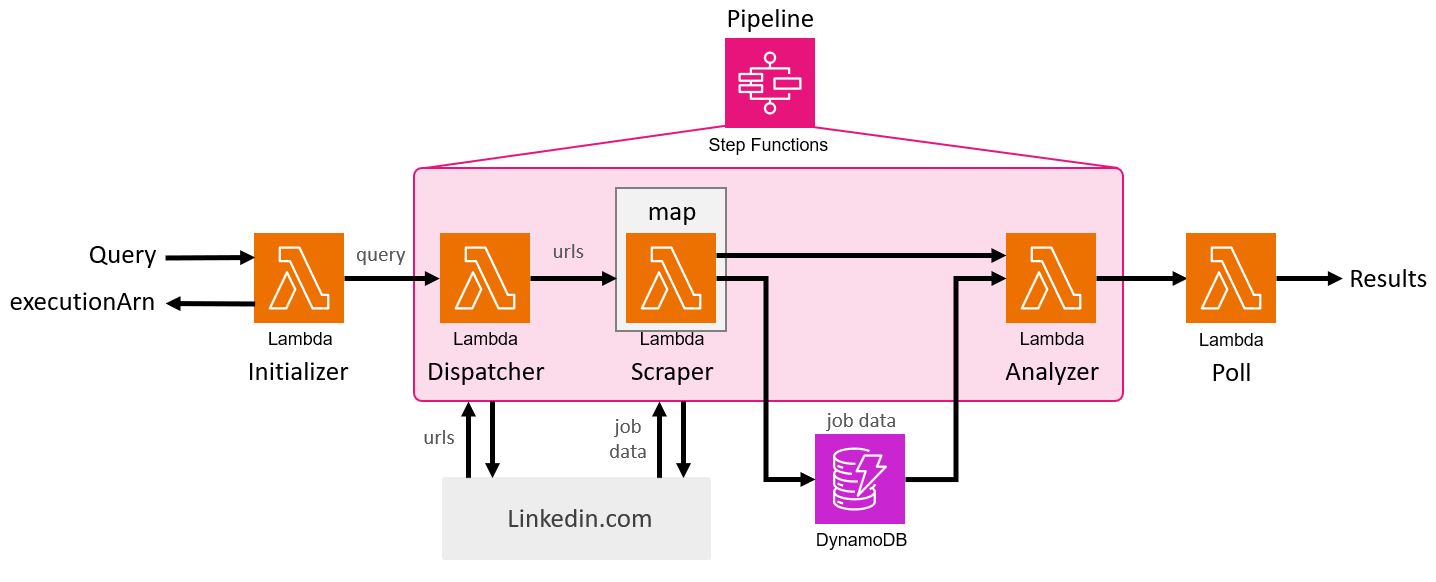
From the Initializer Lambda function, the step function receives the user query. The Dispatcher block performs the initial linkedin scrape to retreive the unique urls of each job posting returned from the query. The Dispatcher forwards this list of urls to a Map function which concurrently executes multiple Scraper functions. Each Scraper takes a single url from the list and scrapes the full job data (title, company, posted date, location, job description) and writes the resulting data to the DynamoDB table. After all Scraper concurrencies finish execution, the Analyzer block runs. This Lambda function queries the DynamoDB table, returning all of the just-scraped job data, and performs the job ranking/similarity search. With the final ranking achieved, the Analyzer function returns formatted results to the API Gateway via the Poll function.
That's it in a nutshell! Now I'll provide a few deeper details on the API and step function formatting.
API Gateway
Here's an example query that a user can send to the deployed API via POST method, which runs through the Initializer Lambda function (sensitive info redacted here):
--location 'https://(REDACT).execute-api.us-east-1.amazonaws.com/job-api-stage1/jobscrape' \
--header 'Content-Type: application/json' \
--header 'x-api-key: (REDACT)' \
--data '{
	"query": "Data Scientist",
	"location": "Chicago",
	"pages": 80,
	"post_time": 3,
	"word_scores": {
		"phd": 1.1,
		"python": 1.1,
		"senior": 0.8
	}
}'
The response returns the "executionArn" which can be used for polling via GET. The structure is pretty simple, and only a few fields are required. Inside the Initializer Lambda function, which processes the API input, I also set some default values for each field in case the user does not provide any.
Meanwhile, here is the GET request to the same API, which operates through Poll Lambda function:
--location --request GET 'https://(REDACT).execute-api.us-east-1.amazonaws.com/job-api-stage1/jobscrape' \
--header 'Content-Type: application/json' \
--header 'x-api-key: (REDACT)' \
--data '{
"executionArn": "arn:aws:states:us-east-1:(stateID):execution:job-scrape-machine:(executionID)"
}'
The response returns the "status" of the execution (e.g. running, failed, or succeeded), and returns the results if status==succeeded. This polling scheme would be easy to implement on a frontend system like a webpage: simply run a script on the page to send a GET request every ~10 seconds or so, and once the response returns status==succeeded, you could display the results to the user. For now, I'll consider a frontend as future work on this project.
Step Function
While the previously shown diagram describes the step function execution pretty well, I thought I would provide the JSON code used in the AWS Step Function UI:
{
	"Comment": "Runs full job scrape and analysis pipeline",
	"StartAt": "Pass",
	"States": {
		"Pass": {
		"Type": "Pass",
		"Next": "Job dispatcher",
		"Assign": {
			"post_time.$": "$.post_time",
			"word_scores.$": "$.word_scores",
			"query.$": "$.query"
		}
		},
		"Job dispatcher": {
		"Type": "Task",
		"Resource": "arn:aws:states:::lambda:invoke",
		"ResultPath": "$",
		"Parameters": {
			"FunctionName": "arn:aws:lambda:us-east-1:711387109035:function:job-dispatcher:$LATEST",
			"Payload.$": "$"
		},
		"Retry": [
			{
			"ErrorEquals": [
				"Lambda.ServiceException",
				"Lambda.AWSLambdaException",
				"Lambda.SdkClientException",
				"Lambda.TooManyRequestsException"
			],
			"IntervalSeconds": 1,
			"MaxAttempts": 3,
			"BackoffRate": 2,
			"JitterStrategy": "FULL"
			}
		],
		"Next": "Map"
		},
		"Map": {
		"Type": "Map",
		"ItemsPath": "$.Payload.url_list",
		"ResultPath": null,
		"ItemSelector": {
			"url.$": "$$.Map.Item.Value",
			"query.$": "$query"
		},
		"ItemProcessor": {
			"ProcessorConfig": {
			"Mode": "INLINE"
			},
			"StartAt": "Job scraper",
			"States": {
			"Job scraper": {
				"Type": "Task",
				"Resource": "arn:aws:states:::lambda:invoke",
				"Parameters": {
				"FunctionName": "arn:aws:lambda:us-east-1:711387109035:function:job-scraper:$LATEST",
				"Payload.$": "$"
				},
				"ResultPath": null,
				"Retry": [
				{
					"ErrorEquals": [
					"Lambda.ServiceException",
					"Lambda.AWSLambdaException",
					"Lambda.SdkClientException",
					"Lambda.TooManyRequestsException"
					],
					"IntervalSeconds": 1,
					"MaxAttempts": 3,
					"BackoffRate": 2,
					"JitterStrategy": "FULL"
				}
				],
				"End": true
			}
			}
		},
		"Next": "Job analyzer",
		"MaxConcurrency": 10
		},
		"Job analyzer": {
		"Type": "Task",
		"Resource": "arn:aws:states:::lambda:invoke",
		"Parameters": {
			"FunctionName": "arn:aws:lambda:us-east-1:711387109035:function:job-analyzer:$LATEST",
			"Payload": {
			"query.$": "$query",
			"post_time.$": "$post_time",
			"word_scores.$": "$word_scores"
			}
		},
		"Retry": [
			{
			"ErrorEquals": [
				"Lambda.ServiceException",
				"Lambda.AWSLambdaException",
				"Lambda.SdkClientException",
				"Lambda.TooManyRequestsException"
			],
			"IntervalSeconds": 1,
			"MaxAttempts": 3,
			"BackoffRate": 2,
			"JitterStrategy": "FULL"
			}
		],
		"End": true
		}
	}
	}
Example execution analysis
Let's look at an example execution of our deployed pipeline. Here's the body of the query I sent to the API:
{
	"query": "Data Scientist",
	"location": "Chicago",
	"pages": 80,
	"post_time": 3,
	"word_scores": {
		"phd": 1.1,
		"python": 1.1,
		"senior": 0.8
	}
}
And here is the graph view of the step function execution:
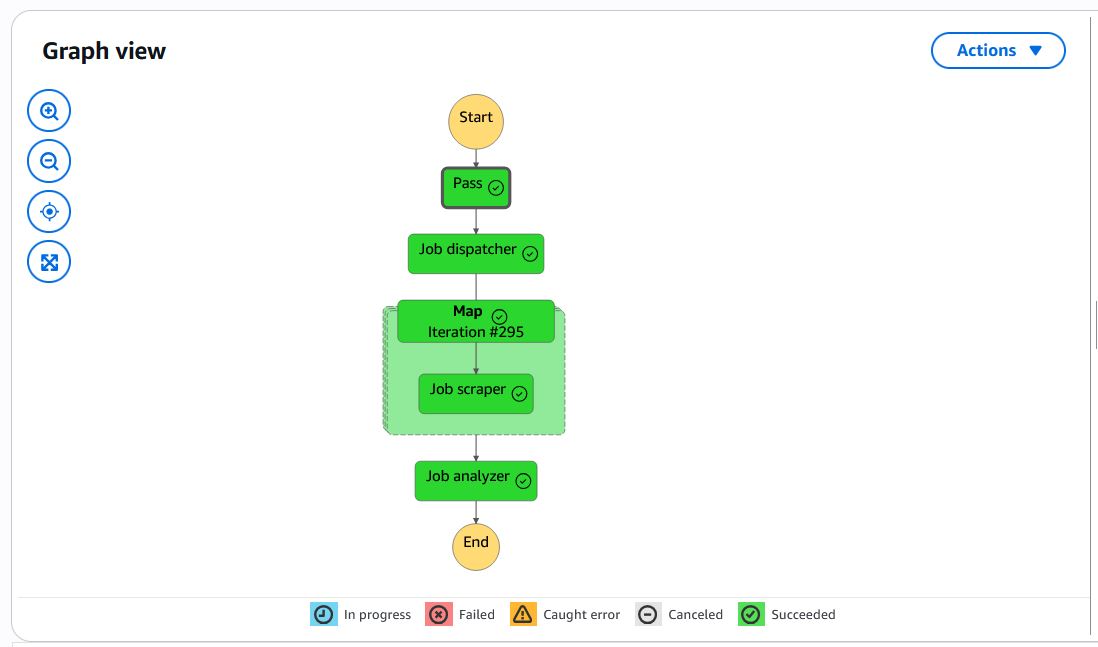
And a breakdown of each task:
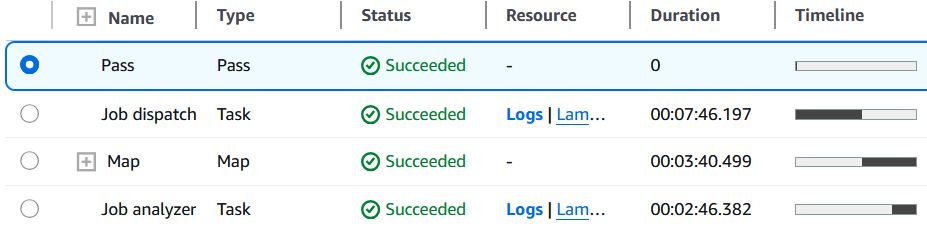
We can see from the Map step that 295 Scraper instances were executed - 295 jobs scraped for analysis. While the query requested 80 pages of results (800 jobs) maximum, returning only 295 means that LinkedIn ran out of results for this query and post time combination. The total run time of the step function was about 14 minutes, and a little over half of that was from the Dispatcher -- scraping the urls for each job posting. Meanwhile, scraping the job data from all 295 urls took less than 4 minutes, and the job ranking analysis less than 3. We can see that the limiting step is the Dispatcher, mainly due to my caution about scrape detection; I specifically include time delays when scraping through the results on the search page in order to avoid detection. This doesn't matter when scraping each job individually, because cookies are not transfered from job to job, whereas I need to preserve cookies while scraping the urls.
Still, these results are more than reasonable for my own use: now, the task of searching through job listings and finding the best ones takes only 15 minutes, and I can multitask while the pipeline runs!
Summary
That concludes Part 4 of my project, the deployment of my pipeline on Amazon Web Services to enable scalable, easy-to-use job scraping and ranking. Although my app is still lacking a frontend for other users to interact with, I'm considering that to be future (and aspirational) work for this project. In the future, I'm also excited to further analyze the cost of storing and running this pipeline on AWS; while miniscule for personal use, it would be important to analyze the billing if intended to deploy to real users at scale.
Overall, I'm very satisfied with the results for my personal use, and I hope this blog has been helpful to anyone reading who wants to implement a similar project or deployment. Thanks for reading!